Gone are the days when only bulky DSLRs could take professional-looking travel photos. With today’s advanced smartphone cameras, you can capture breathtaking landscapes, portraits, food shots, and architectural wonders—all from the palm of your hand.
This beginner-friendly guide will teach you how to take amazing travel photos using your mobile phone, covering everything from composition to editing and storage. Whether you’re on a city break, hiking in the mountains, or relaxing at the beach, these tips will help you preserve your travel memories beautifully.
📌 Section 1: Why Choose Mobile for Travel Photography?
Smartphones have become the go-to camera for travelers, and here’s why:
✅ Portability
Your phone fits in your pocket, unlike DSLRs or mirrorless cameras that require bags and lenses.
✅ Quality
Modern phones offer HDR, night mode, portrait mode, and even RAW image capture.
✅ Editing On-the-Go
With apps like Snapseed, Lightroom Mobile, and VSCO, you can shoot and edit on the same device.
✅ Instant Sharing
You can share your images on Instagram, Facebook, or your blog within minutes.
📌 Section 2: Understand Your Mobile Camera
Before capturing anything, get familiar with your phone’s camera settings:
🔍 Explore Modes:
-
Auto – Great for quick shots
-
Pro/Manual Mode – Adjust ISO, white balance, shutter speed
-
Portrait Mode – Blurred backgrounds for subject focus
-
Panorama – Ideal for wide landscapes
-
Night Mode – Enhances low-light photography
🔧 Enable Grid Lines
Helps with the rule of thirds and better framing.
📷 Use HDR
High Dynamic Range brings out details in shadows and highlights, especially useful in scenic locations.
📌 Section 3: Composition Techniques for Travel Photos
Even with a great phone, composition is key. Here are beginner tips:
📏 1. Rule of Thirds
Place your subject at one-third of the frame (using gridlines) for a balanced image.
🏞️ 2. Leading Lines
Use roads, rivers, fences, or pathways to naturally lead the viewer’s eye into the frame.
🌄 3. Framing
Use windows, arches, or trees to “frame” your subject.
🔁 4. Symmetry & Reflections
Perfect for lakes, buildings, or cityscapes—symmetry adds elegance.
👣 5. Include Human Element
Adding a person in a vast scene shows scale and adds storytelling.
📌 Section 4: Lighting Tips for Better Photos
Lighting can make or break a shot.
🌅 Golden Hour:
Shoot during sunrise or sunset for warm, flattering light.
☁️ Cloudy Days:
Great for even lighting—no harsh shadows.
☀️ Avoid Direct Noon Sunlight:
It can create overexposed or harsh shots. Look for shade.
💡 Low Light? Use Night Mode:
Keep your phone steady or use a mini tripod for sharp images.
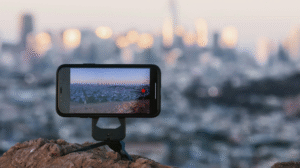
📌 Section 5: Must-Have Mobile Photography Accessories
You don’t need a lot, but a few items can make a big difference:
🪶 1. Mini Tripod
Perfect for night shots, time-lapses, or self-portraits.
🔘 2. Bluetooth Remote
Click photos without touching the phone (avoid blur).
🔍 3. Clip-on Lenses
Enhance creativity with macro, wide-angle, or fisheye lenses.
🌂 4. Lens Wipes
A clean lens = clearer photos. Always carry one.
📌 Section 6: Top Photography Apps for Mobile Editing
Editing can turn a good photo into a great one. Try these:
✨ 1. Snapseed (Free)
-
Crop, tune image, selective edit, healing tool
-
Beginner-friendly
🌈 2. Lightroom Mobile (Free + Paid)
-
Pro-level editing
-
Adjust highlights, shadows, colors
🎞️ 3. VSCO (Free + Premium)
-
Filters and presets for a cinematic look
🌌 4. Afterlight (Free/Paid)
-
Vintage effects, light leaks, textures
📌 Section 7: Travel Photography Ideas with Phone
🌆 Cityscapes
Use wide angles for tall buildings and streets.
🌄 Nature & Landscapes
Focus on foreground objects like rocks or plants for depth.
🍽️ Food Shots
Shoot near windows in cafes. Use portrait mode for shallow focus.
🏛️ Architecture
Use symmetry, patterns, and low angles.
🤳 Selfies & Portraits
Use timer or remote. Shoot in soft light for better skin tones.
📌 Section 8: How to Store & Backup Travel Photos
Traveling means limited storage—don’t lose your memories.
☁️ 1. Cloud Backup
Use Google Photos, iCloud, or Dropbox to auto-upload.
💾 2. External Storage
Carry a small USB or wireless drive for backup.
📦 3. Organize Albums
Sort by location or date for easier access later.
📌 Section 9: Share Your Work
Your photos deserve to be seen!
Use hashtags like #mobilephotography #travelshots
💻 Travel Blog
Embed your photos into stories, guides, or reviews.
Perfect for vertical shots and mood boards.
📸 Join Photography Challenges
Sites like GuruShots or ViewBug offer competitions.
✅ Conclusion
You don’t need expensive gear to take amazing travel photos. With a bit of planning, good lighting, creative framing, and the right editing tools, your mobile phone can become your best travel companion.
Whether you’re exploring local streets or international landmarks, your smartphone has the power to tell visual stories that are just as compelling as those shot on professional cameras.
So grab your phone, charge it up, and get out there — the world is waiting to be captured.